


Penny Mosaic Hexagon Peel and Stick Backsplash Tiles - Gold
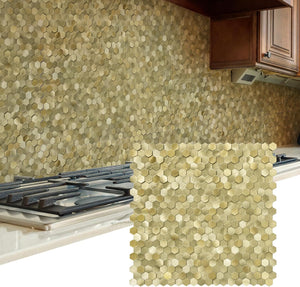
About Hexagon Backsplash:Add a touch of playful elegance to your space with our Hexagon Faux Stone Mixed Metal tile. The marble and metal combo creates a unique, eye-catching design that's perfect for any room. Easy to install, this tile brings a chic and elegance vibe to your home.

Key Features
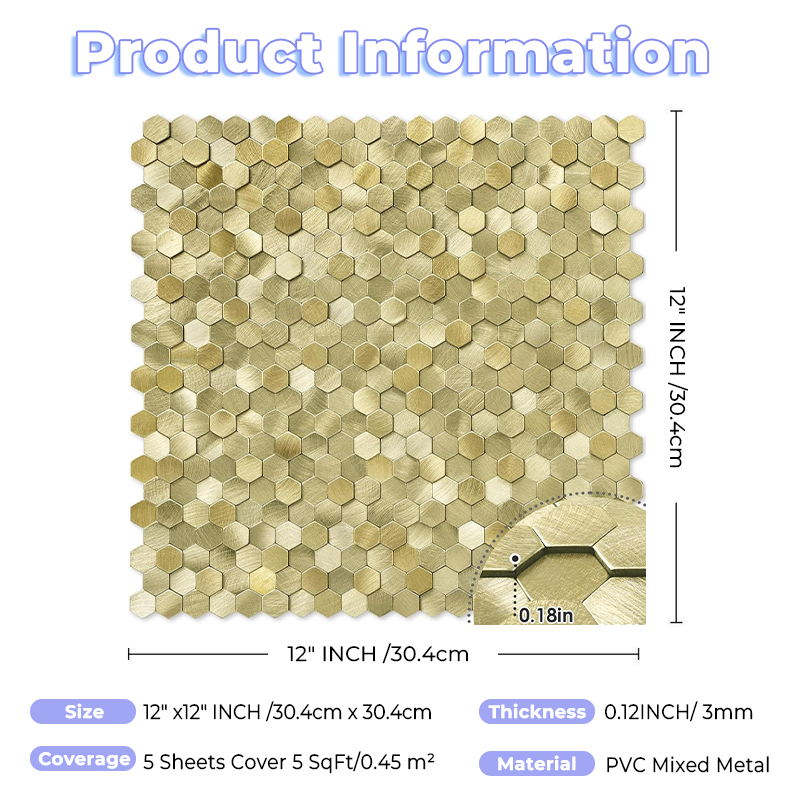
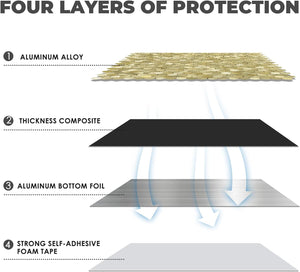
- 3D Metal Mosaic Tiles: This is self adhesive wall tile, made of aluminum, non-fading, scratch-resistant, easy to maintain. Each piece is 12 inch x 12 inch x 0.2 inch, 1pc = 1 sq ft, 4pcs = 4 sq ft. *Note: Please measure dimensions before installation, and confirm the color you want after receiving the items. If there is any questions, please contact us
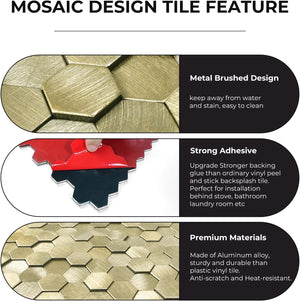
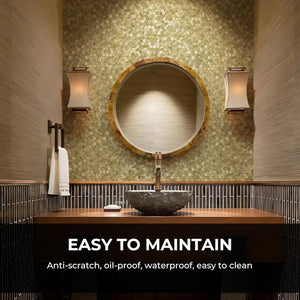
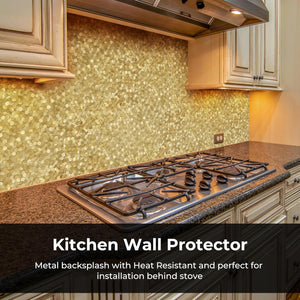
- Premium Features: Made with aluminum materials with an elegant metallic brushed shine. Heat-resistant and moisture-resistant, suitable for installation on almost any wall surface at home. Easily wipe off stains, protecting the wall from water splashes and grease. Enhanced adhesive backing and thickened design make it superior to regular PVC tiles, more durable than plastic self-adhesive tiles
- Easy to Install: These high-quality wall tiles come with time-tested strong adhesive, making them easy to handle, cut, and maintain. Simply peel and stick by removing the protective film on the back and apply to the desired surface. Easily cut with a sharp cutting tool.
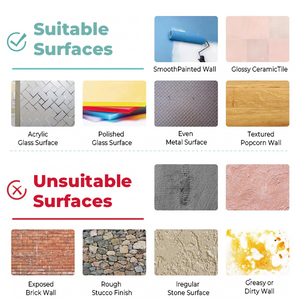
- Wide Range of Uses: This mosaic tile is suitable for sticking on clean, smooth, dust-free, and oil-free surfaces but not recommended for surfaces with water. It is widely used for kitchen island walls, bathroom backsplashes, showers, fireplaces, RVs, and installations behind stoves.
- 10-Year Warranty: We offer the best service to our customers. Feel confident in choosing STICKGOO; our kitchen tiles come with a warranty of at least 10 years. In case of any quality issues, we provide replacement or refund services. If you have any questions during your purchase, please contact us promptly. We will respond within 24 hours.
Detail:
| Brand | BUYSTICKTILES |
|---|---|
| Material | PVC Mixed Metal |
| Size | 12x12 inches |
| Color | Gold |
| Finish Type | Laminate |
| Style | Modern |
| Installation Type | Peel and Stick |
| Product Dimensions | 12L x 12W |
| Pattern | Hexagon |
| Unit Count | 4 Count |
| Item Weight | 2.35 pounds |
Note:
- Recommended Surface: Smooth ceramic tiles backsplash, smooth glass tiles backsplash, acrylic wall panel, pained gypsum, wall linoleum, stainless metal, mirror, laminate, wallpaper.
- Non-Recommended Surface: Oily wall, brick wall, stucco wall, stone wall, unfinished wall (gypsum or plaster), unpainted plywood.
- Please consider 3-5% cutting loss and purchase enough tiles at a time to make sure they come from the same batch to avoid slight color difference.
- Use a level or chalk line to create at least one vertical and one horizontal reference lines to guide tile placement.
- Reinforce with a laminated roller after installation.
- Recommend to use tile trim and caulk (or glass glue) if contact with water.
- The new painting walls need to dry for 3 weeks, make sure the wall is completely dry and dust-free.
- For rough surfaces and heavy textured walls, please follow the instruction:
- Sand the surface with sanding paper or spackling paste
- Clean the wall with damp cloth
- Wait unitl the wall is totally dry
- Spray the adhesive more on the joint area on both wall and tiles


Installation Information for BUYSTICKTILES’s Peel & Stick Products
To ensure a successful installation of your Peel & Stick Tile, please read and review these important installation information bullet points, as well as the back of the product’s packaging:
- Depending upon your product, most Peel & Stick products can be cut with a“sharp” utility knife. Be sure to have extra blades on hand. Some Peel & Stick products do require the use of a wet saw to cut the tiles. Please refer to the product information card on the back of your tile product for details.
- Make sure that the surface is flat, smooth, clean and free of dust, dirt, oils and moisture;
- Check all pieces for any undesired characteristics or variations in pattern before installing;
- Measure each area where each tile is going then mark those cut lines on your tile piece;
- To cut tiles with a utility knife, use a metal ruler or square, balancing your sharp utility blade against its edge. Press firmly on your knife and score along the same line 3-5 times. Bend the tile at the score mark. Flip the tile over, placing the metal ruler along the score mark. Score 3-5 more times. Snap the tile at the score mark and trim off any excess backing. PRO TIP: Cut your tile in one continuous line;
- Change the utility blade knife after 2 tiles;
- Some tile patterns like herringbone, chevron, and hexagon, are difficult to cut because of their shapes. However, using a sharp blade helps prevent frustration;
- Make sure that the tile is positioned properly before applying any pressure to it;
- Apply pressure to the middle and the four corners of the tile;
- Applying pressure to the tile will permanently bond it to the wall. If the tile is installed in the wrong position, removing it may cause damage to the substrate where the tiles have been applied.